Carousel Education provides high quality bespoke support that addresses current educational challenges and practices. Our vision is to enable school leaders and staff to provide the best possible outcomes for all their children. In addition to our resources, we aim to offer down to earth, interactive, innovative and practical solutions for school leaders.
Carousel Education provides high quality bespoke support that addresses current educational challenges and practices. Our vision is to enable school leaders and staff to provide the best possible outcomes for all their children. In addition to our resources, we aim to offer down to earth, interactive, innovative and practical solutions for school leaders.
Automaton Toymaker is a Design Technology unit of work aimed primarily at children aged 9-11. The unit focuses on designing and making an automaton toy using a cam mechanism.
Design Brief: Design and make an automaton toy for the local toy museum
The package provides the medium-term plan, six lessons (each lesson has a MS Powerpoint presentation). Any additional resources are provided as PDFs or as Powerpoint Presentations. This unit of work fulfils the National Curriculum (England) Design Technology requirements for this age group in the following strands of learning:
• Mechanical Systems
• Materials
• Structures
In this project, children apply their knowledge of mechanisms and in particular cam mechanisms, to design and make an automaton toy. They learn about the key features of an automaton and will use this knowledge when designing and making their own product. They learn how cams can change movement in a mechanical system. When creating their toy, they design the automaton character and decide the movement it will make, selecting the appropriate cam mechanism to produce this movement. They make a wooden box structure for their automaton before adding the cam mechanism and the character. Children decorate the automaton to create a scene for the automaton character. They evaluate their finished product against the design brief and design specifications. Finally, they consider improvements they would make to their product and design a Mark II version of their automaton toy.
Windows is a Design Technology unit of work aimed primarily at children aged 7-9.
Design Brief: Design and make a page for the class book inspired by the work of Jeannie Baker
The package provides the medium-term plan, six lessons (each lesson has a MS Powerpoint presentation). Any additional resources are provided as PDFs or as Powerpoint Presentations. This unit of work fulfils the National Curriculum (England) Design Technology requirements for this age group in the following strands of learning:
Materials
Mechanical Systems
In this unit of work children create a page for a class book based on the books created by Jeannie Baker. Each page is a photograph of a window frame that has been made by pairs of children using a simple hinge mechanism. Children use collage techniques to create a view from the window in the style of Jeannie Baker. Children learn about the hinge mechanism which is a simple linkage mechanism of two levers connected by a pivot. Children create a wooden frame for their window and apply their skills of working with cardboard to create the windows. In creating the window children consolidate their knowledge of structures and simple mechanisms and also develop their understanding of how designers use models as part of the designing process.
Sessions:
Investigate Task 1: Window by Jeannie Baker
Investigate Task 2: Investigating Windows & Focus Task 1 – Model Window
Investigate Task 3: Understanding Structures & Focus Task 2 – Making a Window Frame
Design and Make: Designing the Window
Design and Make: Making the Window
Evaluation Session
Design Brief: Design and Make Fashion Waistcoat to wear at the Class Carnival Parade
Sequence of Learning for Teachers
In this unit of work children become costume designers. They design and make a carnival costume to wear in the class carnival parade. The costume consists of a waistcoat and matching mask that are designed around a common carnival theme. Children learn about carnival and the history of waistcoats. They learn how to create a pattern template for a waistcoat and using this pattern template, they cut and assemble fabric pieces, adding buttons and pockets to create a waistcoat product. Children choose a theme for their carnival costume and create a mood board of ideas and images to reflect this theme. Using the mood board they have created, they design and make a waistcoat and matching face mask applying a range of decorative techniques to create their carnival costume. They showcase their carnival costume in the class fashion parade.
This knowledge, skills and understanding is delivered through the following six sessions:
Investigate 1 –What is Carnival? & Focus Task 1 – Fashion Designers and Mood Boards.
Investigate 2 - What is a Waistcoat? & Focus Task 2 – Making a Waistcoat.
Focus Task 3 – Adding Pockets and Fastenings.
Design and Make: Costume Designer.
Design and Make: Costume Maker.
Evaluation: Evaluation activities and class carnival parade.
Some activities / sessions can be re-arranged or delivered in different ways in the learning sequence to allow for whole-class teaching and/or small adult-led sessions to take place at the same time.
Design Brief: Design and make a puppet to tell the story of the Ramayana in a class puppet show.
Sequence of Learning for Teachers
In this unit children make a hand puppet by marking out, cutting and joining pieces of fabric together to create a character from the story of the Ramayana. Children learn about different types of puppets and about some famous puppets such as Sooty and Sweep and the Muppets. They understand that a puppeteer makes the puppet appear alive. They draw a puppet design based on a character from the Ramayana. They learn how to thread a needle and the technique of the simple running stitch. They apply and practise the running stitch to create decorative stitching using Binca material. Stitching two identical templates together they create a basic puppet figure which they then decorate using a range of skills following their puppet design of a character from the Ramayana.
This knowledge, skills and understanding is delivered through the following six sessions:
Investigate 1 – Let’s Find Out About Puppets & Focus Task 1 – Starting to Sew
Investigate 2 – What makes a Good Puppet?
Focus Task 2 – Making a Hand Puppet
Design and Make - Designing Your Puppet
Design and Make - Making Your Puppet
Evaluation Session
Some activities / sessions can be re-arranged or delivered in different ways in the learning sequence to allow for whole-class teaching and/or small adult-led sessions to take place at the same time.
Teddy Explorer is a Design Technology unit of work aimed primarily at children aged 5-7.
Design Brief: Design and make a toy buggy for teddy to explore the world
Sequence of Learning for Teachers
In this unit of work children design and make a toy buggy for their teddy to explore the world. They begin by investigating toy vehicles to see how they work, identifying their different parts and learning about linear and rotational movement. They also learn how a wheel and axle mechanism makes a vehicle move. They then learn about the invention of the wheel and its impact on ancient civilisations. Children are taught woodworking skills to create a simple wooden frame that is used to create the chassis for their buggy. Attaching a wheel and axle mechanism to this frame. children are then able to make a moving vehicle. They research and investigate vehicles in the world around them and toys that have wheels and axles. When designing their toy buggy, they consider all the different objects that teddy will need when exploring the world. They make the body of the buggy and attach it to the wooden frame chassis. Adding a wheel and axle mechanism completes their model. Finally, they decorate their teddy explorer buggy.
This knowledge, skills and understanding is delivered through the following six sessions:
Investigate Task 1: Investigating Toy Cars
Focus Task 1: Working with Wood & Investigate Task 2: Wheels all Around
Design and Make Session 1 – Designing the Toy Buggy
Design and Make Session 2 – Making the Buggy Chassis
Design and Make Session 3 – Making the Buggy Body
Evaluation Session
Some activities / sessions can be re-arranged or delivered in different ways in the learning sequence to allow for whole-class teaching and/or small adult-led sessions to take place at the same time.
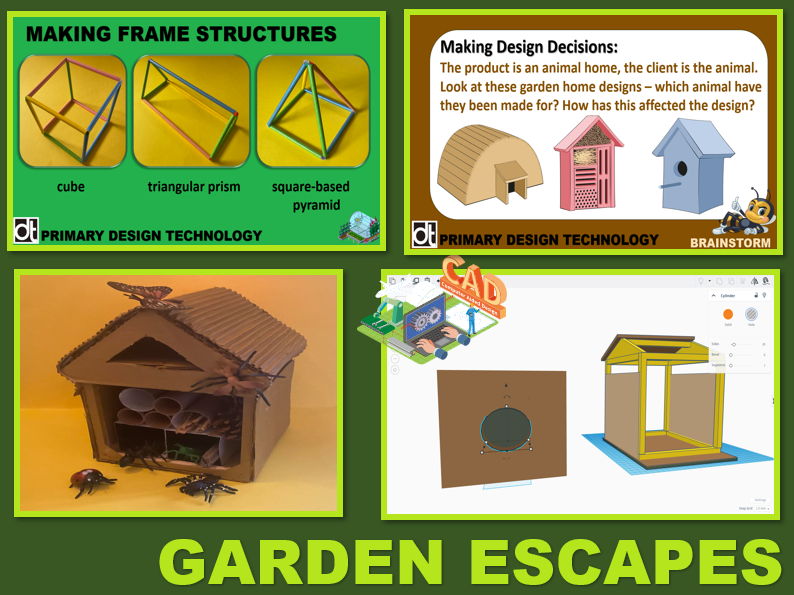
Design Brief: Design and make a small animal home to encourage wildlife to visit the school grounds.
Sequence of Learning for Teachers
In this project, children design and make a prototype animal home for the school garden or a local park. As part of the design process children learn about how to draw 3D objects using isometric drawing techniques. Children learn about frame and shell structures and techniques to make them stronger, stiffer and more stable. They apply this knowledge when making their animal home prototype by constructing a wooden framework using the Jinks method and then use cardboard cladding to create the outer shell structure. As part of the evaluation process children participate in a Dragon’s Den activity where they present their prototype design and model to a ‘panel of experts’.
This knowledge, skills and understanding is delivered through the following six sessions:
Investigate 1 – Animal Homes & Investigate 2 – Investigating Structures
Investigate 3 – Understanding Structures & Focus Task 1 – Making a Wooden Framework
Focus Task 2 – Introducing Computer-Aided Design
Design and Make - Designing the Animal Home
Design and Make - Making the Animal Home
Evaluation Session – Into the Dragon’s Den